
You don’t need to read a stack of textbooks before you start editing. You just need to open up some footage and try cutting it together. That’s how most editors actually start. You shoot something simple, import it, and start experimenting. The basics of storytelling are the same whether you’re working on a Hollywood film or your first Instagram reel: Can you guide someone through a story with pictures and sound?
You already have everything you need to begin. Your phone has a camera, your computer can run editing software, and your brain knows how to tell stories. Think about it: you already do it in conversations every day. Editing is just storytelling with clips.
Even if your first edit feels clunky, that’s perfectly fine! Everyone’s first attempt is rough, no matter what you’re doing. The point is to get comfortable with moving clips around, seeing how a cut changes tone, and noticing how pacing shifts when you trim seconds off a scene. Every edit will sharpen your instincts.
Fun ways to practice video editing
The best part about learning editing is that it doesn’t have to be serious! You can play around. Try things. Fail fast. Learn quicker. The more playful you are, the faster you’ll improve because you’re not paralyzed by trying to make something perfect.
Here are some ways you can dive in:
- Re-cut a favorite film or TV episode. Grab clips and rearrange them. What happens if you change the order of scenes?
- Create a character compilation. Love a certain character? Cut together their funniest or most dramatic moments.
- Make a music video. Use clips from your life and sync them to your favorite track. Timing cuts to beats is an amazing exercise.
- Film something simple. Even a walk through your neighborhood can turn into an edit project.
- Edit everyday clips. Birthday parties, travel footage, or even random clips on your phone can become mini projects.
All of these force you to think about rhythm, pacing, and emotion. And you’ll start to notice how much control you really have in shaping what people feel. Editing is less about technical tricks and more about guiding emotion.
Copy what you like
Watching movies and TV shows with an editor’s eye will change how you see them. Instead of just enjoying the story, start asking: How did they cut from this shot to that one? How long did they hold that reaction shot? Why did they cut to silence here?
Then try it yourself. Copying is not cheating when you’re learning. It’s practice. Musicians cover songs. Painters study old masters. Editors can mimic the choices of their favorite filmmakers.
Take one scene from a movie you love. Recreate it as closely as possible. You’ll notice things like pacing, transitions, and how sound overlaps shots. These details will stick with you, and eventually, you’ll start mixing them into your own edits in a natural way.
Feedback is your secret weapon
Editing is personal, but you don’t grow without feedback. Show your work to friends. Post on forums. Share clips with colleagues. The comments you get will help you see blind spots you missed. Sometimes what’s clear in your head won’t be clear to viewers. That’s normal. Adjust, refine, and try again.
The sooner you invite feedback, the faster you improve. Don’t wait until you feel “ready” to show your work, share as soon as you can. You’ll gain confidence by watching people react, and you’ll start anticipating what works and what doesn’t.
More ways to build your editing skills
Editing is a craft that rewards consistency. The more you do it, the sharper your skills become. Here are some extra exercises to help you push further:
- Limit yourself. Try making a 30-second story out of random footage. Constraints sharpen creativity.
- Mute the sound. Edit a sequence with no audio, focusing only on visuals to tell the story.
- Reverse the challenge. Edit with only audio, adding visuals later. This trains you to prioritize rhythm and emotion.
- Daily edits. Commit to editing something small every day for a month.
Small, frequent projects will teach you more than waiting for one big project to come along.
Basics every editor should know (at some point)
However, at some point, it helps to learn some fundamentals. I personally think it’s better to just start editing and go crazy, but once you get to a certain level it’s good to know actual techniques and basics. These aren’t complicated, but they give you tools to make your edits smoother and more intentional.
Here are some basics to focus on:
| Technique | |
|---|---|
| Cut on action | Makes transitions feel natural when movement continues across cuts. |
| Match cuts | Links two shots visually or thematically to strengthen flow. |
| Montage | Compresses time and shows progress quickly. |
| J and L cuts | Lets audio lead or lag a video cut to improve pacing and flow. |
| Rhythm | Timing cuts to music, speech, or natural beats helps keep viewers engaged. |
| Continuity | Ensures your story feels consistent and doesn’t confuse the viewer. |
| Pacing | Controls how fast or slow your story feels, shaping emotions and tension. |
These techniques are like the grammar of editing. You don’t need to memorize every rule, but once you recognize them, you’ll see opportunities to apply them everywhere.
Resources to help learn video editing
You’ll grow fastest by practicing, but pairing practice with smart learning is unbeatable. Here are a few resources worth exploring:
- YouTube tutorials. Free, endless, and full of both beginner tips and advanced tricks.
- Books like “In the Blink of an Eye” by Walter Murch. Short, approachable, and written by a legendary editor.
- Online classes. Sites like Skillshare or MasterClass let you watch professionals edit in real time.
- Podcasts. Shows like “The Rough Cut” feature real editors talking through their process.
- Watch movies critically. Turn your movie night into homework.
Don’t overwhelm yourself with too many resources at once. Pick one, apply what you learn, and repeat.
How Visla helps you learn video editing faster
Once you’re in the rhythm of editing, speed matters. You want to try ideas quickly, not get stuck in menus. That’s where Visla makes a huge difference.
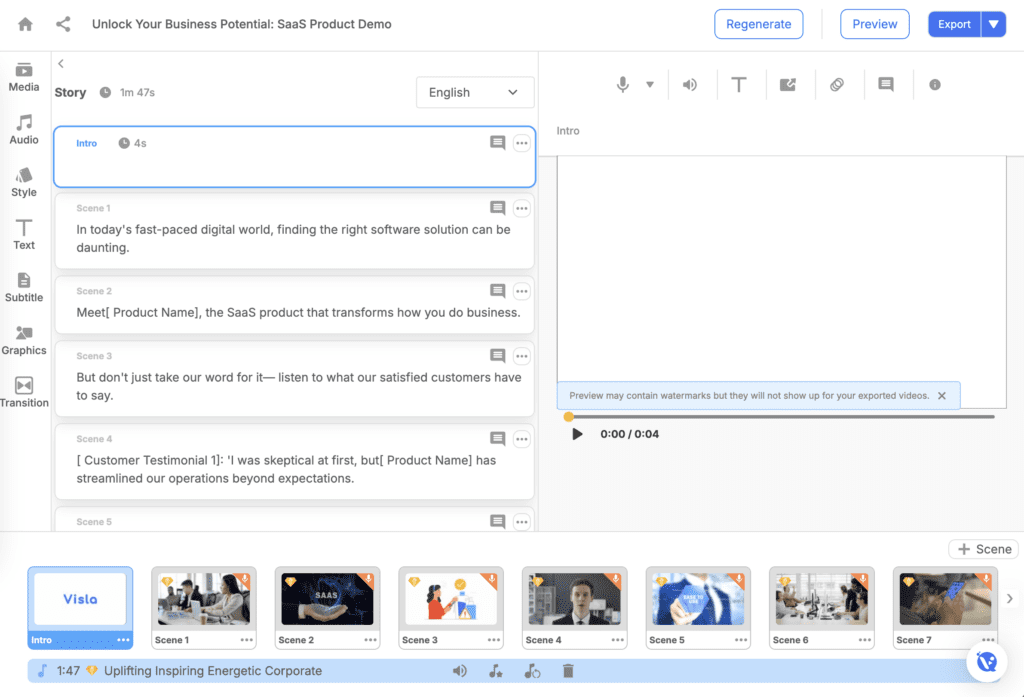
Visla’s AI Video Editor trims filler words, awkward pauses, and bad takes automatically so you can focus on the creative parts. Its scene-based editing lets you rearrange and refine clips one section at a time, which makes experimenting less overwhelming. You can use the AI Video Generator to turn text or ideas into full videos instantly, giving you drafts to practice editing on. And when you’re collaborating, Visla’s Workspaces keep projects, feedback, and approvals in one place.
Visla also helps you polish with tools like automatic subtitles, music recommendations, and even AI-driven b-roll suggestions. That means you can focus on learning pacing and storytelling without spending hours searching for stock footage or writing captions.
The faster you move through ideas, the more you learn. Visla takes away the busywork so you can spend your time developing instincts, testing storytelling choices, and refining your style.
The final cut on learning video editing
Video editing is one of those skills that can only be learned by doing. You don’t need permission, expensive gear, or a perfect plan. You just need to start. Open your camera roll, drop clips into an editor, and see what happens. Copy, experiment, ask for feedback, and repeat. Every project you touch teaches you something new.
And with tools like Visla, you can move faster, polish your work more easily, and experiment without limits. That’s the real secret: the more you edit, the better you get. So don’t wait for the perfect project. Your next edit, no matter how small, could be the one that teaches you something that sticks forever.
FAQ
Practicing edits privately is usually fine, but uploading those clips can trigger copyright issues unless your use qualifies as “fair use,” which depends on four factors (purpose, nature, amount, and market effect). When you post publicly, platforms like YouTube can flag copyrighted material via Content ID even if you only used a short snippet. If you plan to share, make your edit clearly transformative (commentary, critique, parody) and keep clips brief. This isn’t legal advice — read the fair-use basics and YouTube’s guidance before you publish.
For TikTok, stick to vertical 9:16, .mp4 or .mov, and up to 10 minutes (ads spec mirrors general support and is a reliable baseline). Instagram Reels also favors vertical 9:16; check their help page for current aspect-ratio and quality tips. For YouTube, export at the same frame rate you shot, use progressive scan, and follow YouTube’s recommended encoding settings.
Pick one frame rate and keep it consistent across your project; YouTube specifically recommends uploading in the same frame rate you recorded. Common choices like 24, 25, 30, and 60 fps are all fine — use 60 fps if you want extra-smooth motion (sports, gameplay) and 24 or 30 fps for most talking-head and lifestyle videos. Mixing frame rates can introduce stutter or motion artifacts unless you know how to handle conversions.
A practical target for web video is around −14 LUFS integrated because YouTube uses downward loudness normalization near that level (it turns loud mixes down but doesn’t turn quiet mixes up). Keep true peaks ≤ −1.0 dBTP to avoid distortion after platform encoding. Use your editor’s loudness meter to check LUFS and true-peak before exporting.
Use proxy files: low-resolution copies that are much easier for your computer to play back while you edit. Premiere Pro (and other NLEs) let you toggle between proxies and the original full-quality footage for finishing, so you keep quality on export. This workflow speeds things up dramatically on modest machines.
May Horiuchi
May is a Content Specialist and AI Expert for Visla. She is an in-house expert on anything Visla and loves testing out different AI tools to figure out which ones are actually helpful and useful for content creators, businesses, and organizations.