
Quick Answer
The best Visla features are the ones that help you publish faster without making your workflow feel chaotic, bloated, or weirdly fragile. For me, that means starting with webpage to video, sharpening visuals with AI Director Mode and AI-generated b-roll, and using an AI Avatar or my own cloned voice when a video needs more presence. It also means having practical tools that keep the whole system moving, like screen capture, step-by-step recording, branding controls, aspect ratio changes, and collaboration spaces. If you’re regularly turning existing content into polished videos for multiple channels, these are the 10 Visla features that matter most in my real weekly process.
If you’re a long-time reader of this blog, or even a first-time reader who just wandered in here by accident, you’ve probably noticed that there’s usually a video attached to what I write. I make those with Visla. Which, yes, is always a nice endorsement of your own product, but more importantly, it’s because it’s actually a fast way to turn existing content into something useful, watchable, and publishable. These aren’t features I picked because they sound impressive on a landing page. They’re the ones I actually use every week in my bi-weekly blog-to-video workflow.
And that, really, is my definition of a “best” feature. It has to save real time. It has to improve the final output. Or it has to remove some annoying little production bottleneck that would otherwise slow everything down. Ideally, it does all three.
1. AI Director Mode
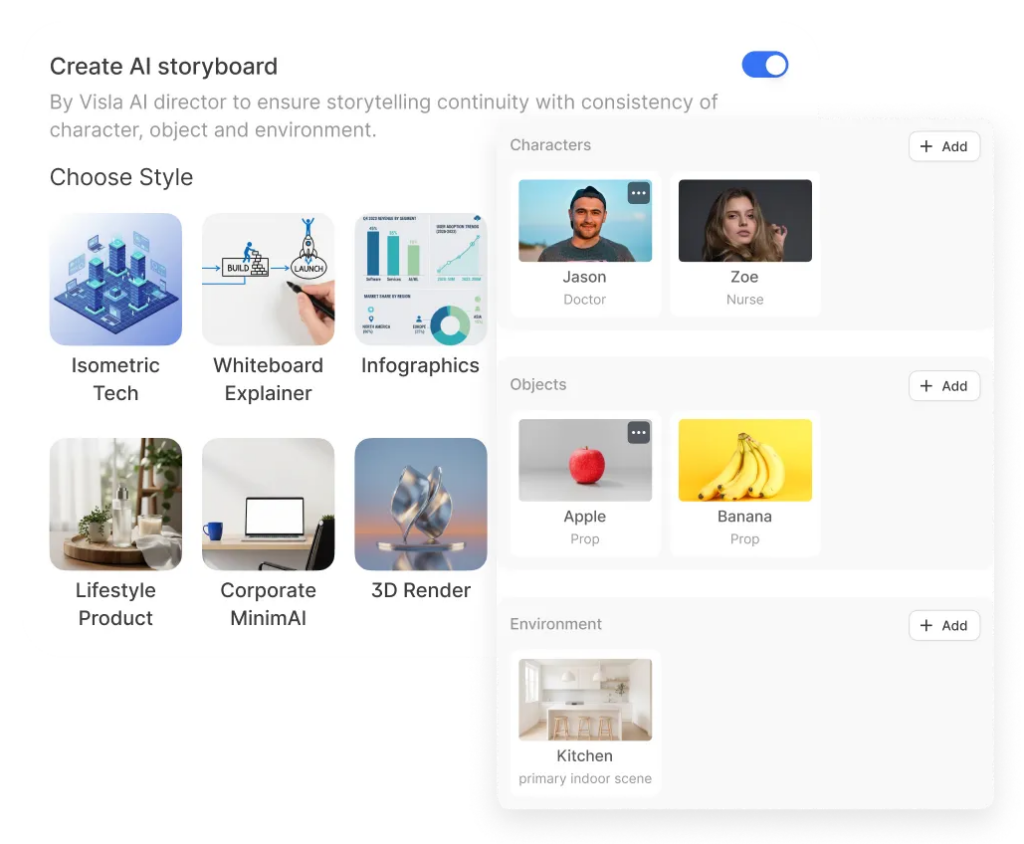
AI Director Mode is probably my favorite Visla feature when I want more control over the footage that actually shows up in my videos. Sometimes I don’t want generic b-roll. Sometimes I want something more specific, more creative, or simply more tailored to the topic at hand. Sometimes I want visuals that couldn’t exist in a stock library at all.
That’s why this feature is so useful. It gives me a storyboard-first workflow, which means I can shape the video scene by scene before I commit to generating clips. That makes my life a lot easier.
I can guide the characters, objects, environments, pacing, and overall continuity instead of just crossing my fingers and seeing what happens. And when I’m making a business video that still needs a little personality, or a blog companion video that can’t survive on generic footage alone, that’s a huge advantage. It keeps the entire video feeling intentional.
2. AI Avatar
I don’t need an AI Avatar in every video. That’d be overkill. But when I do need a presenter, it’s incredibly handy.
There are plenty of cases where a human presence makes a video clearer, warmer, or just easier to sit through. That’s especially true for explainers, walkthroughs, tutorials, and videos that need a slightly more direct, conversational feel. If I want that effect but don’t want to schedule a shoot, set up a camera, deal with lighting, or put myself on screen for a relatively short supporting video, AI Avatar is the obvious shortcut.
And I mean that in a good way. It’s not cutting corners on quality. It’s cutting out friction. That’s why it works so well in a recurring workflow. I can add a presenter when the video benefits from one, skip all the usual production overhead, and keep moving.
3. AI Voice Clone
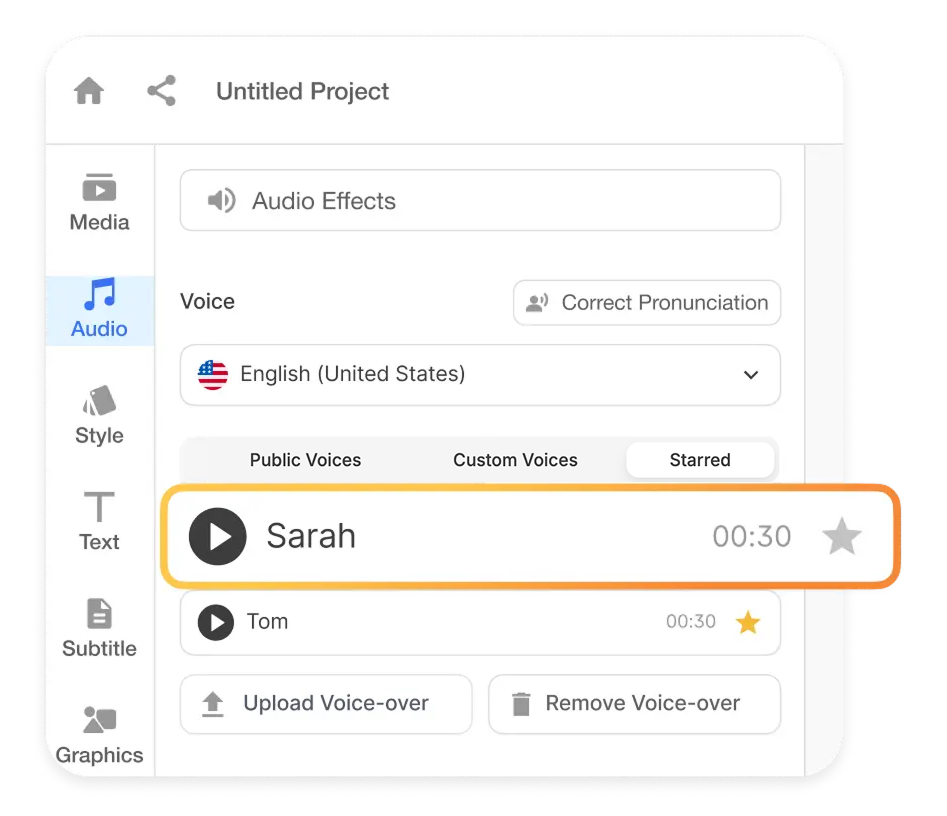
This is one of those features that sounds like a gimmick right up until you actually use it. Then it stops sounding like a gimmick very quickly.
If I want a video to sound like me, but I don’t want to record every single line from scratch every single time, AI Voice Cloning is a huge help. It lets me keep a more personal, more recognizable voice across videos while moving much faster. That’s especially useful when I’m revising a draft, updating a section, changing wording late in the process, or adapting the same piece of content for more than one version.
Instead of re-recording everything because I changed two lines and a transition, I can just keep going. That’s not a small convenience. In a real publishing workflow, that’s the difference between getting something done and putting it off until tomorrow for no good reason.
4. AI B-Roll Video Generator
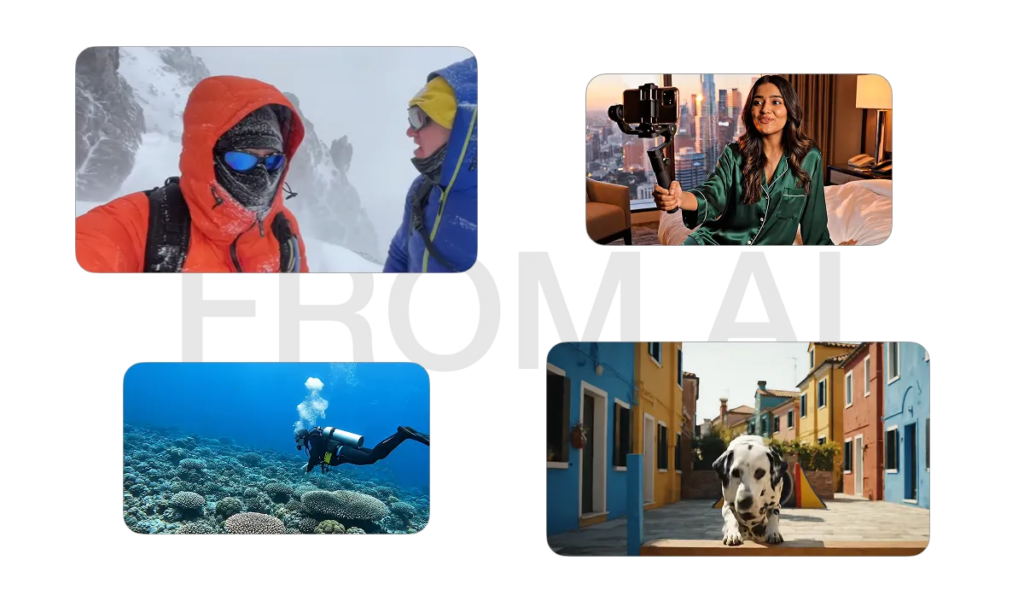
This is the feature I use when a mostly stock-footage-based video needs one or two shots that are simply too specific for stock to handle well. Sometimes I want a scene that maps tightly to the exact subject I’m talking about. Sometimes I want something more imaginative. Sometimes the available stock is technically relevant but still looks wrong. Too broad. Too generic. Too “some guy in a modern office pointing at a tablet” for what I actually need.
That’s where the AI B-roll Video Generator becomes really useful. It fills the gaps. It lets me create the shot I want instead of settling for the closest available approximation and pretending that’s fine.
It’s also a reminder that model flexibility matters. OpenAI has already announced the shutdown timeline for the Sora API, so it wouldn’t make much sense to anchor a long-term workflow to one model and hope for the best. What I care about more is that Visla’s broader AI video workflow still supports other options, like Google’s Veo 3 and Veo 3.1. So for me, this feature isn’t just creatively useful. It’s practically resilient.
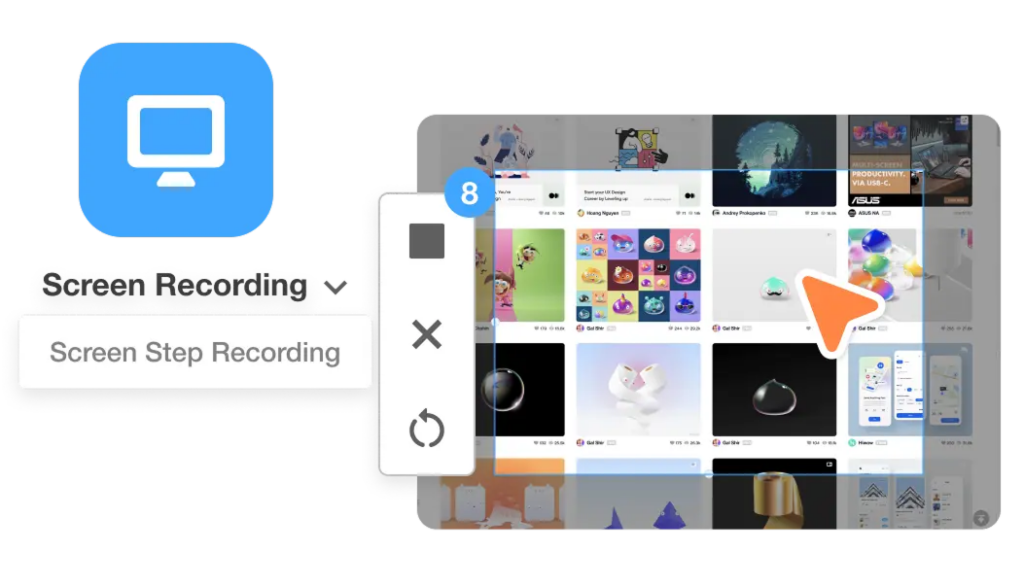
5. Screen Step Recorder

If I want to show a step-by-step process on my device, this is the option that just makes sense.
The Screen Step Recorder is excellent for creating guides around specific processes, software workflows, and any task where users need to understand a sequence clearly. And the important part is that it doesn’t just give me a raw recording and call it a day. It turns a process into an actual structured guide. That’s very different.
A plain screen recording can be helpful, sure. But a real step-by-step walkthrough is easier to follow, easier to reuse, and usually more useful for the audience. It’s also a better asset for the business. A single good process video can support a blog post, help customers, reduce support friction, and give other teams something reusable.
6. AI Screen Recorder
The Screen Step Recorder is great when I want the workflow to be highly structured. The AI Screen Recorder is great when I want more freedom.
Sometimes I don’t want every action turned into a formal step. Sometimes I just want to record naturally, explain what I’m doing, and let AI help clean up the rough edges afterward. That’s where this feature shines. It gives me flexibility on the front end and efficiency on the back end.
Which, frankly, is what you want from AI in the first place. I don’t need it to replace judgment completely. I need it to remove tedious cleanup work. This feature does that well.
7. Branding

Branding is one of those features that sounds a little boring until your content starts looking inconsistent across projects and channels. Then it suddenly becomes very interesting, because now you have a real problem.
Since I create videos for the Visla blog, having branding controls inside the workflow is genuinely useful. It helps keep logos, colors, styling, and the overall visual identity of the videos consistent without forcing me to rebuild those choices manually every single time. That might sound small. It isn’t.
The more often you publish, the more important this gets. Repetition magnifies inconsistency. Small mismatches start piling up. Videos stop feeling like they belong to the same system. Branding features help prevent that.
It’s also worth being direct about plan differences here. The full branding feature set is really a Business or Enterprise advantage, which makes sense because that’s where brand consistency becomes much more operationally important across teams. If you’re publishing lots of video content, that matters. More than people think, honestly.
8. Webpage to Video
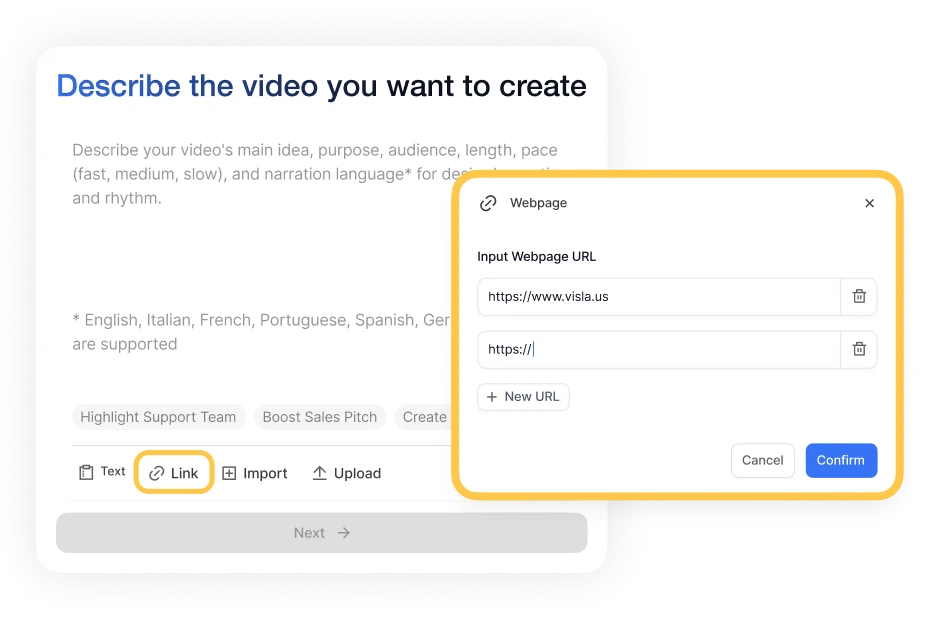
This is how I start most of my blog companion videos. I feed the webpage into Visla, use the AI Video Agent to help generate a draft, and then build from there.
That starting point is incredibly valuable. Beginning from a blank timeline is one of the easiest ways to waste time, overcomplicate the whole process, and somehow convince yourself that opening nine tabs counts as progress. It usually doesn’t. Webpage to video gets me past that immediately.
It gives me structure. Scenes. A first-pass video draft. Something to react to, improve, reshape, and refine. That’s a much better place to begin than staring at an empty project and pretending inspiration is about to arrive.
And more importantly, it fits how I actually work. I’m not trying to create a completely separate asset from nothing every time I publish a blog. I’m trying to repurpose strong existing content into a polished video efficiently. This feature is the foundation of that process.
9. Change Aspect Ratio
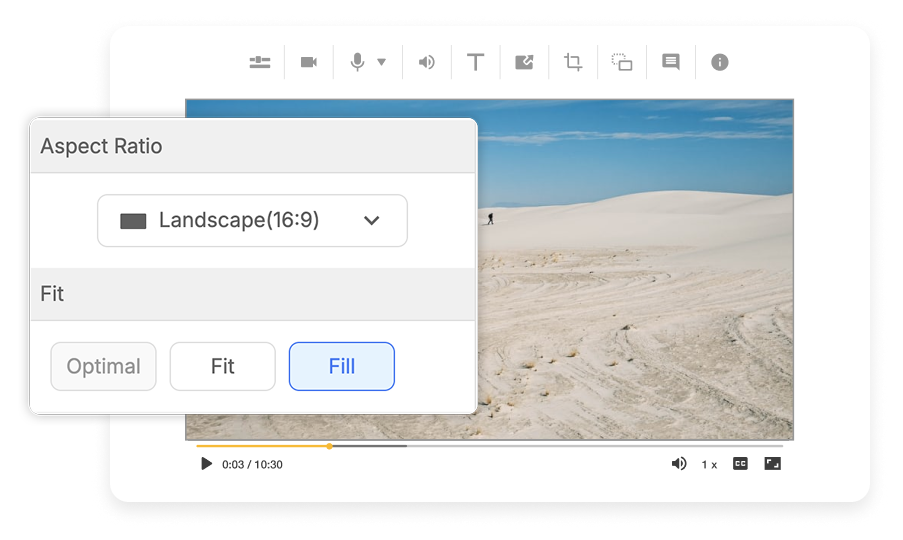
This might sound like a small feature. It isn’t. Not if you actually publish in more than one place.
I use all the main aspect ratios because different channels need different formats. I need 16:9 for the blog itself and for YouTube. I need 1:1 for LinkedIn. I need 9:16 for YouTube Shorts and other vertical placements. That’s normal now. A modern video workflow has to account for that.
So yes, changing aspect ratio might sound simple. But simple and important are not opposites. In fact, some of the most important features in any product are the ones that quietly eliminate repetitive nonsense.
If I couldn’t adapt videos for different outputs inside the same workflow, publishing across channels would get annoying very fast. I’d either skip formats I should be using or waste time bouncing between tools and rebuilding layouts for no good reason. A lot of workflows fall apart at the repurposing stage. This feature helps prevent that.
10. Workspaces and Teamspaces
How Workspaces and Teamspaces Connect
Try it yourself: create new Teamspaces, rename them, or remove ones you’ve added. This is how teams organize video projects in Visla.
No recurring video process stays purely solo forever. Or at least, no good one does.
Even when I’m doing most of the creation work myself, I still need collaboration, feedback, organization, approvals, and clean handoffs. That’s where Workspaces and Teamspaces come in. I use them in a very practical, very unglamorous, very important way.
I create the videos. I export them in different sizes. A teammate can review, comment, or handle part of the publishing process. For example, my teammate can upload the 16:9 and 9:16 versions to YouTube while I handle placing the 16:9 version in the blog itself and the 1:1 version in LinkedIn.
That may not sound dramatic. Good. It shouldn’t. Collaboration features are at their best when they make the boring parts easier and the handoffs cleaner. That’s exactly what these do. They keep projects organized, feedback visible, and the whole publishing system from turning into an avoidable mess.
The real reason these are the best Visla features
The best Visla features aren’t necessarily the ones with the flashiest demo. They’re the ones that make a real, repeatable workflow better.
For me, that means getting from blog post to polished multi-channel video faster, with less friction, better visuals, more consistency, and far less tool-switching. That’s why this list looks the way it does. It starts with features that help shape visuals, moves through features that help me capture and refine content, and ends with the ones that help me publish and collaborate like a normal person with deadlines.
If you’re trying to do the same thing I do every week, which is turn existing written content into useful, polished videos without wasting half your life in production limbo, these are the 10 Visla features I’d pay attention to first.
May Horiuchi
May is a Content Specialist and AI Expert for Visla. She is an in-house expert on anything Visla and loves testing out different AI tools to figure out which ones are actually helpful and useful for content creators, businesses, and organizations.